How to Create a Carousel Slider in Divi Without a Plugin

Carousel sliders are very popular in web design. They can help you display services, images, features and any other content you might have which normally would take a lot of space, but if you use the carousel you can save that space and improve the user experience significantly.
In this tutorial, I will show you how to add carousel functionality to your Divi website. We will use the 3rd party Swiper.js library and some custom CSS to style the slider just like we want.
To add the slider functionality to your Divi website, you need to call the swiper.js in your child theme’s functions.php file. If you don’t use a child theme yet, you can build one using our tutorial on How to Create a WordPress Child Theme for Divi or create a child theme with our free child theme generator.
We have also prepared a free Divi section with a beautiful slider layout which can be downloaded for free. If you go that route, then you can skip steps 2 and 3 from the below tutorial. You will still need to enqueue swiper.js and add configuration code to your child theme’s functions.php file (see step 1).
Updated on February 11th 2022
We corrected the code to allow displaying multiple sliders on one page. PHP code has been updated and CSS Class .dp-carousel must be added to the row (to the CSS Class field, not CSS ID).

Add custom code to functions.php
All PHP code must be added to the Divi’s child theme functions.php file. You can edit this file using FTP, File Manager on your server, or Theme Editor available in the WP Dashboard. I will use Theme Editor.
To enqueue the swiper.js library, in our child theme, please follow these steps:
- Go to Appearance → Theme Editor
- Open your child theme’s functions.php file
- Add custom PHP code
- Click Update File

PHP
<?php
// Enqueue Swiper.js Library
function dp_carousel(){
   wp_enqueue_script( 'your-swiper-js-slug', 'https://unpkg.com/swiper@7/swiper-bundle.min.js', [] , '7.0.2', true );
   wp_enqueue_style( 'your-swiper-css-slug', 'https://unpkg.com/swiper@7/swiper-bundle.min.css', [] , '7.0.2');
}
add_action('init', 'dp_carousel', 99);

function dp_carousel_slider_scripts() {
?>
  <script type="text/javascript">
  // adding navigation html
  (function(){
    window.addEventListener('DOMContentLoaded', function(){
        let sliders = document.querySelectorAll('.dp-carousel')
        sliders.forEach(function( slider ) {
            swiper_init(slider)
        })
    });

    function swiper_init(slider){
         // configuration
         if(slider === null) return;
         // extra controls
         let extraControls = '';
         // If we need pagination
         extraControls += '<div class="swiper-pagination"></div>';
         // If we need navigation buttons
        extraControls += '<div class="swiper-button-prev"></div><div class="swiper-button-next"></div>';
        slider.innerHTML = '<div class="swiper-container" style="overflow:hidden">' + slider.innerHTML + '</div>' + extraControls;

         // Wait for Swiper
        var waitForSwiper = setInterval( function () {
            if (typeof Swiper != "undefined") {
                clearInterval(waitForSwiper);
                let carousel_container = slider.querySelector('.swiper-container');
                const swiper = new Swiper( carousel_container , {
                    slidesPerView: 1, // mobile value
                    loop: true,
                    spaceBetween: 0, // mobile value
                    autoplay: {
                    delay: 3000,
                    },
                    speed: 600,
                    // If we need pagination
                    pagination: {
                    el: '.swiper-pagination',
                    clickable : true,
                    dynamicBullets: true
                    },
                    // Navigation arrows
                    navigation: {
                    nextEl: '.swiper-button-next',
                    prevEl: '.swiper-button-prev',
                    },
                    breakpoints: {
                    768: { // Tablet
                        slidesPerView: 2,
                        spaceBetween: 20,
                    },
                    981: { // Desktop
                        slidesPerView: 3,
                        spaceBetween: 30,
                    }
                    }
                });
            }
        }, 20);
   }
})();
</script>
<?php }
add_action( 'wp_footer', 'dp_carousel_slider_scripts');
Create layouts for the carousel using the Divi Builder
Now we need to design all items that will be displayed in our slider using the Divi Builder. We will need to add some custom classes and ID to row, column and modules. 1 column layout must be used, and it will convert to the carousel based on the column numbers we have defined in the configuration PHP code.
For this tutorial, I have used Blurb modules with some cool styling and hover effects, but feel free to use any Divi module you want.
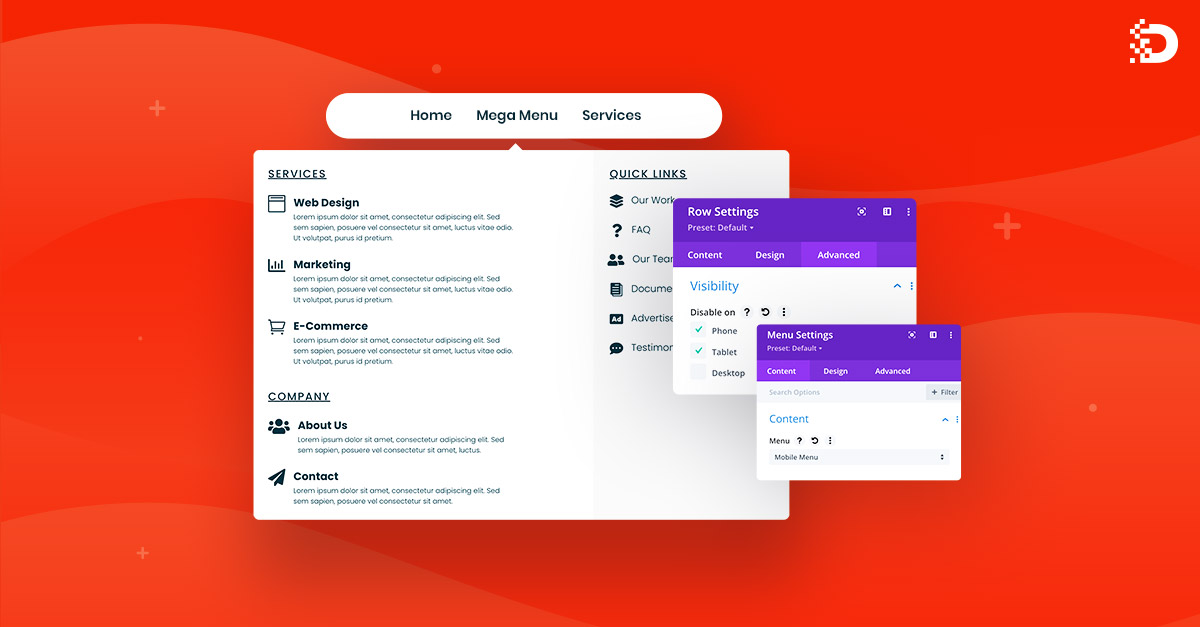
Configure Row and Column
- Add Section with single column layout
- Add CSS Class dp-carousel to the Row
- Add CSS Class swiper-wrapper to Column
- Add CSS Class swiper-slide to each module
- Using the Divi Builder on your page, add a section with 1 column row
- Search for the Blurb module and add it to the page

- Open Row settings by clicking the gear icon in the green toolbar
- Go to Advanced → CSS ID & Classes
- Add dp-carousel to CSS Class field

- Switch to Content tab
- Open Column settings
- Add swiper-wrapper class to CSS Class field

Blurb Module Customization
- Open Blurb module settings
- Go to Advanced tab
- Add swiper-slide to CSS Class field

- Go to the Content tab and open the Text toggle
- Add Title and Body texts
- In Background toggle add Background Image

- Customize Title style in Design → Title Text toggle
Here are my settings:
- Title Font – Abhaya Libre
- Color – #415962
- Title Text Size – 26px and 22px on mobiles
- Customize Body text style in Design → Body Text toggle
My settings:
- Title Font – Open Sans
- Color – #879296
- Body Text Size – 14px and 12px on mobiles
- Body Line Height: 1.5em

Add Blurb Spacing and Custom CSS
In this last step we need to add a Blurb Spacing and Custom CSS to apply white background to the content container and zoom animation to the background image.
- In Blurb settings go to Design → Spacing toggle
- Add Padding for desktops 300px/1.5vw/1.5vw/1.5vw
- Add Padding for tablets 220px/30px/30px/30px
- Add Padding for mobiles 200px/20px/20px/20px

- Go to Advanced tab and open Custom CSS toggle
- Add background size and transition to Main Element field
background-size: 100%;
transition: all .5s; - Add background size and transition to Main Element on hover
background-size: 105%;
transition: all .5s;

- Add background color and padding to Blurb Content Custom CSS field
background-color: white;
padding: 30px 1.5vw; - Add background color and padding to Blurb Content field on hover
background-color: white;
padding: 30px 4vw;

Duplicate your Blurb module
Now, we have the Blurb module ready so we can duplicate it as many times as we want to add new blurbs to our carousel. In each duplicated module you only need to replace texts and change the background image.

Add Custom CSS for arrow navigation and pagination
Our slider is almost ready. In this last step we need to add some custom CSS to style our slider navigation and pagination. This code can be added to the Divi/Theme Options/Custom CSS or to your child theme’s style.css file.
CSS
/* DP Slider Navigation */

.dp-carousel .swiper-button-prev {
	transform: none;
    margin-top: -100px;
    top: 10px !important;
    margin-left: auto!important;
    right: 52px;
	font-size: 20px !important;
	background-color: #fff;
    padding: 25px !important;
}
.dp-carousel .swiper-button-next {
	transform: none;
    top: 10px !important;
    margin-top:-100px;
    right: 0px !important;
    background-color: #fff;
    padding: 25px !important;
}

/* Arrow Size and Style */
.swiper-button-next:after, .swiper-button-prev:after {
	font-size: 20px;
    color: #aed4e4;
}

/* DP Slider Pagination */
.dp-carousel .swiper-pagination-bullet-active {
	background-color: #fff;
}
.dp-carousel .swiper-pagination-bullet {
	background-color: #fff;
    top: 15px;
}
Divi Pixel Carousel Slider for Divi
The Divi Pixel plugin is a premium solution for Divi designers and developers. It comes with over 200 Divi theme settings and 31 powerful modules that will enhance your Divi builder capabilities.
With Divi Pixel you can easily create carousel sections in the Divi theme. You can use default elements, like Icons, Title Text, Descriptions, and Buttons, or select Divi Library items to be displayed in your carousel module. This creates unlimited possibilities. In other words, with the Divi Pixel Carousel module, you can slide anything! This module gives you total control over slider style and content displayed, and this all can be done in the module settings, without writing a single line of custom code.

This is it! We hope you enjoy reading this tutorial. Adding a slider to your Divi website is a great idea and can help you display your content in a more engaging and beautiful way. Whenever you use custom code or 3rd party plugin for carousels, make sure they are working on mobiles devices.

Maciej Ekstedt
Maciej, co-founder of Divi Pixel, is a passionate web designer and marketing expert who thrives on turning creative ideas into effective strategies. His fascination with the intricacies of megalopolises influences his work, where he meticulously crafts detailed solutions for his company.
Enhance your Divi Theme with Custom Settings and New Modules. Start Creating Awesome Websites with the Divi Pixel
We offer a 14 Day Money Back Guarantee, so joining is Risk-Free!
Hi, thank you very much for the manual, but would it be possible to have more modules in one column? Because I created a product info modul with text, module, text module.
Hi Dominika,
No, this unfortunately is not possible with this tutorial implementation. Sorry :/
Not work with latest divi, can not update functions.php
It works fine Bart, so you must be doing something wrong. I’m not sure 🙂 Please try to follow once again, step by step. It works.
This is exactly the functionality I’m trying to achieve. However, when I copy and paste the code for the functions.php file, it ends up triggering a critical error. Do you know what might be causing that?
Hi Gary. Most likely you already have an opening PHP tag in your functions.php, so you need to remove that from our code – https://imgur.com/I3dJKA3
Hi
Thank for the great tutorial. Is it possible to put 2 carrousels on 1 page.
It is not working on my site …
Do I need to chance something in the code?
Hi. We have updated this tutorial to use it in multiple instances. You need to update PHP code in your functions.php file and add .dp-carousel CSS Class to the row (not CSS ID as before) – see point 2 🙂
I think there is a problem with your class. You’re referring to dp_caroussel (step 2.5) and dp-caroussel. In order to work, use dp-caroussel.
Great catch! Thanks, Olivier. I have updated the tutorial 🙂
Hi Maciej, thanks a lot for that awesome caroussel and for the multiple instances update.
However having two instances in the same page makes the pagination bullets disappear, any idea why?
Cheers! Aurélien
Thanks a lot for the tutorial also from my end – very useful indeed!
I had the same question about the pagination bullets, plus when creating 2 carousels on a page the navigation arrows operate both carousels at the same time, not individually.
Is there a way to have individual navigation with these codes?
Hi, great writing and its really impressive, I’ve made a few adjustment to suit my style. And I love it. 👍👍👍
Hi Maciej, thank you so much for this. It worked out perfectly, exactly what I wanted. I wanted to ask in the line wp_enqueue_script( ‘your-swiper-js-slug’, ‘https://unpkg.com/swiper@7/swiper-bundle.min.js’, [] , ‘7.0.2’, true ); where ‘your-swiper-js-slug’ is mentioned, does that need to be replaced with a unique name.
Regards and Thanks a lot for this.
Hello Sainink,
You can replace it with a unique ID, but you don’t have to 🙂 It’s up to you.
Great tutorial! Is it possible to do the same thing with posts and create a blog carousel?
Thank you!
Hi. I believe that would be possible. You would need to use the Blog module instead of Blurbs, but each Blog module would have to display a different blog.
Hi, This is a brilliant tutorial, It works great, but I have a question, how can I remove the navigation arrows completely?
Hey (i’m not the creator, but has just done the same thing),
If you comment out the below code (putting // in front of the line):
extraControls += ”;
inside the function.php code, the pagination will be removed 🙂
This is gold! Thank you very much for the code!
I have encountered a problem though. On laptop I sometimes find it difficult to click on a project. It just swipes the projects instead. Do you know how this could be? I’m only displaying two projects, no matter the screen size.
Nevermind, i figured it out! I added:
preventClicks: false
To the desktop-view, which solved the problem!
Thank you
really good !