How to Create Slide-In Banner in Divi

Pop-ups are probably the most frequently mentioned, but unfortunately also the most hated option. Although many people will assure you that they have increased their newsletter subscription by a good percentage, they will forget to mention that they angered 99% of their visitors.
So what can we do differently?
While we wish our visitors the best experience, we can’t always give up the opportunity to increase the conversion on our website. There are better ways to guide visitors through your website and increase subscribers to your newsletter or increase sales in your online store. One of them is a less invasive Slide-in Banner that appears in the corner of the page.
Let’s take a look at how you can easily add it to your Divi website without the need for an additional plug-in. We will add it in the Global footer, so the same slide-in banner will appear on all pages. But you can also play around and create different footers for different pages, that include a different slide-in banner. The possibilities are endless. You can follow this tutorial, or download free section, ready-to-use below.
Create new or edit existing footer
Go to Divi → Theme Builder and create new Global Footer. You can build it from scratch or if you already have one you can just open it. We will not mess with existing content.

Create new row for the banner
- Create new row with one column and assign a “banner” ID in the Advanced tab.
Note: You can also set Admin Label to Banner to easily find it in the Wireframe View. - Add background color to your row (I chose white background color).

Go to Design tab
Click on Sizing tab and set sizes:
- Width: 300px
- Max Width: 300px
Click on Spacing tab and set padding:
- Padding Top & Bottom: 20px
- Padding Left & Right: 15px

Now we add some shadow to our banner to make it stand out more from the content of the page.
- Choose the first option – outer shadow
- You can leave the other fields as default, we will just set shadow color to:
rgba(0,0,0,0.13)

Go back to the Advanced tab
- Go to Position tab → Select “fixed” position.
- Choose where you want your banner to be. I chose the bottom left corner so I just clicked there on little box below the position window. You can also position in to right side or the top of the page.
- Set Horizontal Offset to 20px and
- Z-index to 9999.
Tip: It is better to place banner at the bottom, as it will be less annoying to visitors when reading the content on the page.

Add Close button
We want to allow our visitors to close the banner. So we need to add a close button to our row.
- Create new Code module and assign a “close” class to in the Advanced tab it. Be careful not to add it to ID CLASS tab.
- Go to the Advanced tab → Position and select “absolute” and choose upper right corner.
- Go to the Advanced tab → Custom CSS and add this line of code to the Main Element field:
cursor: pointer; - Go to the Design tab → Sizing set width to 20px.

Go to Content → Text and copy the code below in the Code field.
HTML
<span class="et-pb-icon" style="font-size: 20px;">M</span>
Add Blurb module
Note: You may need to switch to wireframe view.
- Add blurb module.
- Set your image, name and position or short description about you.
- Go to the Design tab and open Image & Icon options.
Image/Icon Placement: Left
Image Rounded Corners: 50% - Set Sizing:
Image Width: 45px
Max width: 90% - Disable animation:
Animation → Image/Icon Animation -> No Animation - In the Advanced tab→ Custom CSS → Blurb Title paste this line:
padding-bottom: 5px;

Add Text module and write your CTA.
- Add Text module.
- Go to the Design tab → Spacing and set padding:
Padding top: 10px
Padding bottom: 20px - Style your text as you wish, make sure to specify a larger font (18-22px).
Add Buttons
First we’ll add CTA button.
- Add a new Button module.
- Set good button text, something like “Yes, take me there” or “I want to book a call”.
- Set your link where you want to send visitors to (a landing page, contact form etc.).
- Style as you wish or keep the default style.
- Go to the Design tab and set Button Aligment to center.
- Give it the class “close” in the Advanced tab.
- Go to Custom CSS in the Advanced tab and copy next line in the Main Element field:
width: 100%;

Now we add another button – an option for visitors to refuse your offer and close banner.
- Duplicate first Button module.
- Replace text button with something like “No, thank you” or “Maybe another time” and remove link.
- Change style. It’s a good idea to give it a different look that should be less emphasized than the first button. I will use the same colors but will not assign a background color to it.

Edit banner position in the Advanced tab.
We want to hide the banner by default, so we will assign negative offset to it.
Vertical Offset should be at least a negative number of the total height of your banner. You can just drag the dot to the left until your whole banner is hidden from the screen. I set mine to -315px.

Add CSS
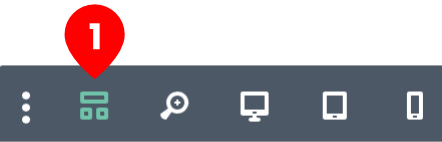
- Go to the Wireframe View.

- In your Banner row add a new Code module below the second button. Give it an Admin Label: CSS. Copy the following code into the Code field.
CSS
<style>
/* Slide in */
.et-fb-root-ancestor #banner {
bottom: 20px !important; /* Banner will always be visible in Theme Editor */
}

#banner.show {
transition: 0.8s all;
bottom: 20px;
opacity: 1;
}
#banner.hide {
transition: 0.6s all;
opacity: 0;
}
</style>
Add JS
After CSS code module we add another Code module and assign Admin Label: JS. Copy the following code into the Code field.
JS
<script type="text/javascript">
            function setCookie(key, value, expiry) {
                var expires = new Date();
                expires.setTime(expires.getTime() + (expiry * 24 * 60 * 60 * 1000));
                document.cookie = key + '=' + value + ';path=/' + ';expires=' + expires.toUTCString();
            }
            function getCookie(key) {
                var keyValue = document.cookie.match('(^|;) ?' + key + '=([^;]*)(;|$)');
                return keyValue ? keyValue[2] : null;
            }
            function eraseCookie(key) {
                var keyValue = getCookie(key);
                setCookie(key, keyValue, '-1');
            }
            function closeSetCookie() {
                jQuery("#banner").addClass('hide').removeClass('show');
                setCookie('hide-banner', true, 7) // Cookie Exists for 7 days
                return false
            }
            jQuery(document).ready(function() {
				jQuery('#banner').addClass('hide').removeClass('show');
                if (getCookie('hide-banner') == null || getCookie('hide-banner') == false) {
                    setTimeout(function() {
                        jQuery("#banner").addClass('show').removeClass('hide');
                    }, 5000) // 5000 - 5 seconds before banner is visible
                }
                jQuery(".close").click(function() {
                    closeSetCookie()
                })
            })
</script>
- We set 7 days for Cookies. This means that after they click on a button or a close icon, the banner will not be visible to them for 7 days. You can change this value.
- We also set a timeframe of 5 seconds before the banner is visible. You can also change this to another value.
- Save changes and go take a look at your website. Note: If you close the banner you will not see it again for 7 days. Test it in the incognito window. You can always view and edit it in Theme Builder.
This is it! I hope you enjoy reading this tutorial and it will help you display your promotions in a more beautiful and engaging way. If you want more tutorials, make sure to sign up to our newsletter at the bottom of this site.

Kaja Haler
Kaja is the CEO of a boutique online agency, a young mom, a perfectionist, a front-end developer & Divi enthusiast, with a great passion for beautiful websites that bring results. She has been making websites for the sixth year in a row, and for the last two years she has been paying a lot of attention to conversion design, as a beautiful website is good, but a beautiful website that sells is even better.
Kaja Haler
Divi Enthusiast
Do you want to create this Slide-in Banner on your Divi website without additional plugin?
Enhance your Divi Theme with Custom Settings and New Modules. Start Creating Awesome Websites with the Divi Pixel
We offer a 14 Day Money Back Guarantee, so joining is Risk-Free!

Thanks Kaja, useful article. I’ll use it.
Thank you, I am glad you like it.
Merci beaucoup Kaja ! c’est super cool et très pratique ! J’adore !
Thank you. 🙂
This is really cool! I see popups at the top and bottom of the page … which is an example of the finished product?
Thank you, it’s the one at the bottom left 🙂
I really like the purple popup that enlarges when you scroll over it. How did you do that?
Great post. Thank you for writing it. I will use it for myself and my clients 🙂
Thank you 🙂
Do you have the problem that cookies do not work as they should? A window pops up every time I reload the page : |
Yes, this is how it works on our site, so you can see it all the time. We set cookies to 0 🙂
Yes, it already works beautiful 🙂
Thanks
This works beautifully. Thanks so much for posting. Is there coding that could shut the banner after 10 seconds? As a non-coder, I do not know how to do this. Thanks in advance.